DIY: Sunburst Mirror
Sunday, July 1, 2012
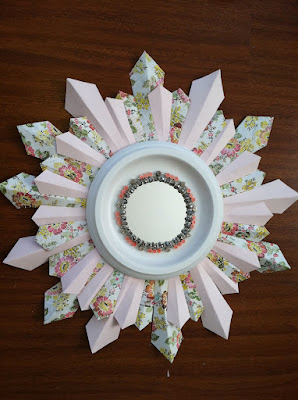
I give 100% credit for this tutorial to Heather on Setting for Four. I saw her take of the ever so popular sunburst mirror on Pinterest, and decided to follow her tutorial to make one for myself. This is how mine turned out:
Perhaps not as nice as Heather's, but I still love the outcome. These are the materials I used:
-Scrapbook paper: I used a plain baby pink scrapbook paper and one with a floral print
-Plain white computer paper
-Hot glue gun
-Scissors
-10 inch ceiling medallion
-12 inch wooden ring
-5 inch mirror
-2 silver beaded bracelets
-2 bracelets with silver charms and coral beads
Also pictured is a string of coral colored shells that I was planning to use, but decided against it.
Heather does a thorough job of explaining the steps on her entry, but I will also summarize them here.
1) Use the plain white computer paper to cut out your desired ray shape that will give your mirror the sunburst effect. I created two different sized rays.
2) Use these cut-outs as a template to trace onto your scrapbook paper. I cut out 13 large rays and 26 small rays. Fold the rays in half to add dimension.
3)Glue these around your wooden ring. As you can see, I added two small rays in between each large ray. Tip: Attach the rays as close to the center of the ring as possible so that very little to no wood shows. I didn't do that on one part of the wooden ring and it was evident when I attached the medallion to it!
4) Glue the mirror onto the medallion.
5) Take your beaded silver bracelets and cut the waistband. Be careful when you do this or the beads will explode, fly, and scatter everywhere--speaking from personal experience. Place the stringed beads around the mirror and glue it onto the medallion.
6) Repeat the step above with the other bracelets that has the charms. Obviously, you can use any other decorative bracelet or material. Heather used shell beads on hers. The one I chose added some more texture and color to my mirror, which I liked.
7) Glue the medallion onto the wooden ring and voila! You've got yourself a lovely sunburst mirror.
Mine is currently hanging above my entrance table by the front door, and I love it. If you follow this tutorial or made your own version of the sunburst mirror, I would love to see it.


1 comments:
Your version of my DIY Sunburst mirror looks so adorable Joanne!! Thanks for crediting me and my blog in your post. Appreciate that! I have a degree in Microbiology and Biotechnology - I see you just graduated in Bio Sci!! I love the papers and beads you chose - I imagine you are really enjoying it in your space! Have a great week and good luck at optometry school! Heather :)
Post a Comment