DIY: Dry Erase Calendar w/ Paint Chips

 Tuesday, July 17, 2012


This is a very easy and affordable project. I didn't have any large frames on hand, so I went to AC Moore and snagged a 11"x16" one on sale for $10 (originally $22). Then, I went next door to Home Depot and raided their paint chip selection. I grabbed way more than I needed, but hey, they're free.

These are all the supplies you need:
-Large frame (Mine was 11"x16" and it was the perfect size for 2"x2" squares. You could get one that is slightly larger if you want your paint chips to be more spaced out.)
-Paint chips
-Glue or double sided tape
-Scissors
-Dry erase marker

I don't think a tutorial is necessary for this project; it's pretty self explanatory! :)

P.S. I didn't think I would appear in the reflection as evidenced by the attractive towel on the top of my head.. at least I'm dressed. ;-)

Read more...

Antique Vanity Makeover & First Furniture Painting Experience

 Saturday, July 14, 2012


I found this beauty on Craigslist for $90. It's circa 1920s and made of solid mahogany wood. I decided to bring new life to this already stunning vanity. All my furniture is white anyway, so I wanted to keep with the theme. I have never painted furniture before, so I was very apprehensive. However, with caution and technique, I successfully transformed this vanity into a beautiful asset in my bedroom.

These were all the supplies I used
:
-100m sandpaper (Lowes)
-Zinsser primer (Lowes)
-Olympia paint in White (Lowes)
-Floetrol (Lowes)
-Paint trays (Dollar store)
-Mini foam rollers (Dollar store)
-Foam brushes (Target)
-Small paintbrush (Michaels)
-Cloth


This is what the vanity looked like after I primed. I'm typically a perfectionist, so I surprised myself by not taking extra steps to make this piece look more presentable. I figured that since I would be applying several coats of paint afterwards, it wouldn't matter how my prime job looked like. In fact, I took this time to test out whether I liked using a paintbrush or foam rollers better. On the left side of the vanity, I used a paintbrush and on the right side, I used a foam roller. Although it's hard to tell in the picture, the right side looks much neater, and took half the time as opposed to using the brush on the left side. After that, I put my brush away and did not use it for the remainder of the project. I was using Purdy paintbrush, fyi. Don't forget to sand your piece before you prime. Sanding is not necessary for all finishes (i.e. laminate), but I felt that I should sand this piece since the surface was not completely smooth. I used a cloth to remove the debris. A hand held vacuum works well too.


This is what the vanity looked like after 1 coat of paint. Much better, but still a lot of wood showing through. I would need at least 3, maybe 4 more thin coats. Make sure you apply your paint in THIN coats. Several thin coats will look much better than 1 thick coat. I mixed a small amount of Floetrol, a paint conditioner, with my paint to minimize any roller marks.


After 2 coats. I painted the second coat the following morning. Make sure you wait at least 6-8 hours before applying another coat. Even if the paint may be dry to the touch, you still want to wait. I learned this from blogs written by professional painters.


Third coat! I am loving how this piece looks by the end of this coat. I debated on whether or not I should paint a 4th coat, but I decided against it. I liked the somewhat distressed/shabby chic appeal with parts of the wood seeping through. It looked natural, and not like a bad paint job. I took the time to touch up on some areas with a small paintbrush, such as the fluted legs and the crevices of the detailing above the drawers.

All in all, this was a pretty tiresome process. I enjoy painting, but this vanity had so many grooves and such that it was more tedious than I had anticipated. Will I do another paint job? Yes, if it's mostly flat surfaces (i.e. dresser or table). No, if it's a complicated piece. ;)

Read more...

DIY: Sunburst Mirror

 Sunday, July 1, 2012

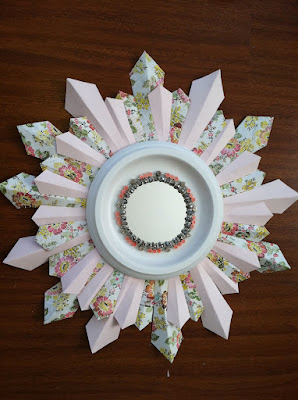
I give 100% credit for this tutorial to Heather on Setting for Four. I saw her take of the ever so popular sunburst mirror on Pinterest, and decided to follow her tutorial to make one for myself. This is how mine turned out:


Perhaps not as nice as Heather's, but I still love the outcome. These are the materials I used:


-Scrapbook paper: I used a plain baby pink scrapbook paper and one with a floral print
-Plain white computer paper
-Hot glue gun
-Scissors
-10 inch ceiling medallion
-12 inch wooden ring
-5 inch mirror
-2 silver beaded bracelets
-2 bracelets with silver charms and coral beads

Also pictured is a string of coral colored shells that I was planning to use, but decided against it.

Heather does a thorough job of explaining the steps on her entry, but I will also summarize them here.

1) Use the plain white computer paper to cut out your desired ray shape that will give your mirror the sunburst effect. I created two different sized rays.

2) Use these cut-outs as a template to trace onto your scrapbook paper. I cut out 13 large rays and 26 small rays. Fold the rays in half to add dimension.

3)Glue these around your wooden ring. As you can see, I added two small rays in between each large ray. Tip: Attach the rays as close to the center of the ring as possible so that very little to no wood shows. I didn't do that on one part of the wooden ring and it was evident when I attached the medallion to it!

4) Glue the mirror onto the medallion.

5) Take your beaded silver bracelets and cut the waistband. Be careful when you do this or the beads will explode, fly, and scatter everywhere--speaking from personal experience. Place the stringed beads around the mirror and glue it onto the medallion.

6) Repeat the step above with the other bracelets that has the charms. Obviously, you can use any other decorative bracelet or material. Heather used shell beads on hers. The one I chose added some more texture and color to my mirror, which I liked.

7) Glue the medallion onto the wooden ring and voila! You've got yourself a lovely sunburst mirror.


Mine is currently hanging above my entrance table by the front door, and I love it. If you follow this tutorial or made your own version of the sunburst mirror, I would love to see it.

Read more...

Blog template by simplyfabulousbloggertemplates.com

Back to TOP