Haul: Room/Home Decor

 Friday, August 10, 2012

I moved into my new apartment last month, and I have been having a blast decorating the space! I didn't put much effort into decorating my last apartment because I knew I would only be living there for a year. I think I'll probably live in my current apartment for 3-4 years while I attend optometry school. I have been scouting vintage home decor places, thrift stores, garage sales, Marshalls, Ross, and the like for unique home decor items. I was able to find some cute pieces this week that I would like to share:

Letter holder from Marshalls


Subway art from Marshalls

"Home" Photography from Artscape in Baltimore, MD

Tealight Holder from a vintage decor shop

Corner shelf from a vintage decor shop


Read more...

DIY: Two Tiered Jewelry Tray

 Sunday, August 5, 2012


This was an incredibly easy and inexpensive project. I bought two plates from the clearance section at TJ Maxx for $5 total and a candle holder at AC Moore for $3.


I'm aware that you can purchase candle holders at dollar stores, but my local dollar store did not carry them. I spray painted my candle holder white, and used my hot glue gun to attach the two plates onto the candle holder. The total time to complete this project was under 10 minutes!


Read more...

DIY: Dry Erase Calendar w/ Paint Chips

 Tuesday, July 17, 2012


This is a very easy and affordable project. I didn't have any large frames on hand, so I went to AC Moore and snagged a 11"x16" one on sale for $10 (originally $22). Then, I went next door to Home Depot and raided their paint chip selection. I grabbed way more than I needed, but hey, they're free.

These are all the supplies you need:
-Large frame (Mine was 11"x16" and it was the perfect size for 2"x2" squares. You could get one that is slightly larger if you want your paint chips to be more spaced out.)
-Paint chips
-Glue or double sided tape
-Scissors
-Dry erase marker

I don't think a tutorial is necessary for this project; it's pretty self explanatory! :)

P.S. I didn't think I would appear in the reflection as evidenced by the attractive towel on the top of my head.. at least I'm dressed. ;-)

Read more...

Antique Vanity Makeover & First Furniture Painting Experience

 Saturday, July 14, 2012


I found this beauty on Craigslist for $90. It's circa 1920s and made of solid mahogany wood. I decided to bring new life to this already stunning vanity. All my furniture is white anyway, so I wanted to keep with the theme. I have never painted furniture before, so I was very apprehensive. However, with caution and technique, I successfully transformed this vanity into a beautiful asset in my bedroom.

These were all the supplies I used
:
-100m sandpaper (Lowes)
-Zinsser primer (Lowes)
-Olympia paint in White (Lowes)
-Floetrol (Lowes)
-Paint trays (Dollar store)
-Mini foam rollers (Dollar store)
-Foam brushes (Target)
-Small paintbrush (Michaels)
-Cloth


This is what the vanity looked like after I primed. I'm typically a perfectionist, so I surprised myself by not taking extra steps to make this piece look more presentable. I figured that since I would be applying several coats of paint afterwards, it wouldn't matter how my prime job looked like. In fact, I took this time to test out whether I liked using a paintbrush or foam rollers better. On the left side of the vanity, I used a paintbrush and on the right side, I used a foam roller. Although it's hard to tell in the picture, the right side looks much neater, and took half the time as opposed to using the brush on the left side. After that, I put my brush away and did not use it for the remainder of the project. I was using Purdy paintbrush, fyi. Don't forget to sand your piece before you prime. Sanding is not necessary for all finishes (i.e. laminate), but I felt that I should sand this piece since the surface was not completely smooth. I used a cloth to remove the debris. A hand held vacuum works well too.


This is what the vanity looked like after 1 coat of paint. Much better, but still a lot of wood showing through. I would need at least 3, maybe 4 more thin coats. Make sure you apply your paint in THIN coats. Several thin coats will look much better than 1 thick coat. I mixed a small amount of Floetrol, a paint conditioner, with my paint to minimize any roller marks.


After 2 coats. I painted the second coat the following morning. Make sure you wait at least 6-8 hours before applying another coat. Even if the paint may be dry to the touch, you still want to wait. I learned this from blogs written by professional painters.


Third coat! I am loving how this piece looks by the end of this coat. I debated on whether or not I should paint a 4th coat, but I decided against it. I liked the somewhat distressed/shabby chic appeal with parts of the wood seeping through. It looked natural, and not like a bad paint job. I took the time to touch up on some areas with a small paintbrush, such as the fluted legs and the crevices of the detailing above the drawers.

All in all, this was a pretty tiresome process. I enjoy painting, but this vanity had so many grooves and such that it was more tedious than I had anticipated. Will I do another paint job? Yes, if it's mostly flat surfaces (i.e. dresser or table). No, if it's a complicated piece. ;)

Read more...

DIY: Sunburst Mirror

 Sunday, July 1, 2012

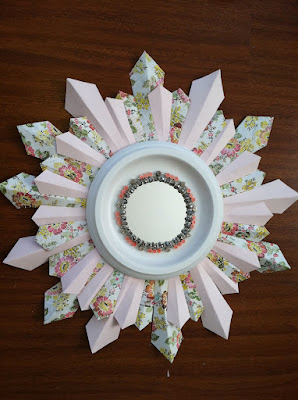
I give 100% credit for this tutorial to Heather on Setting for Four. I saw her take of the ever so popular sunburst mirror on Pinterest, and decided to follow her tutorial to make one for myself. This is how mine turned out:


Perhaps not as nice as Heather's, but I still love the outcome. These are the materials I used:


-Scrapbook paper: I used a plain baby pink scrapbook paper and one with a floral print
-Plain white computer paper
-Hot glue gun
-Scissors
-10 inch ceiling medallion
-12 inch wooden ring
-5 inch mirror
-2 silver beaded bracelets
-2 bracelets with silver charms and coral beads

Also pictured is a string of coral colored shells that I was planning to use, but decided against it.

Heather does a thorough job of explaining the steps on her entry, but I will also summarize them here.

1) Use the plain white computer paper to cut out your desired ray shape that will give your mirror the sunburst effect. I created two different sized rays.

2) Use these cut-outs as a template to trace onto your scrapbook paper. I cut out 13 large rays and 26 small rays. Fold the rays in half to add dimension.

3)Glue these around your wooden ring. As you can see, I added two small rays in between each large ray. Tip: Attach the rays as close to the center of the ring as possible so that very little to no wood shows. I didn't do that on one part of the wooden ring and it was evident when I attached the medallion to it!

4) Glue the mirror onto the medallion.

5) Take your beaded silver bracelets and cut the waistband. Be careful when you do this or the beads will explode, fly, and scatter everywhere--speaking from personal experience. Place the stringed beads around the mirror and glue it onto the medallion.

6) Repeat the step above with the other bracelets that has the charms. Obviously, you can use any other decorative bracelet or material. Heather used shell beads on hers. The one I chose added some more texture and color to my mirror, which I liked.

7) Glue the medallion onto the wooden ring and voila! You've got yourself a lovely sunburst mirror.


Mine is currently hanging above my entrance table by the front door, and I love it. If you follow this tutorial or made your own version of the sunburst mirror, I would love to see it.

Read more...

Beauty Haul: iHerb & Amazon

 Saturday, February 4, 2012


Hi everyone! I want to share a collective beauty haul from iHerb and Amazon. I will not review any products in this post because I've only used them once or twice thus far.

I stumbled upon this post on Apartment Therapy, and became very interested in coconut oil. I have troubled skin (blemishes, hyper-pigmentation, sensitivity, dry spots, etc), and everyone was raving about how coconut oil worked miracles for their skin and hair. I don't live near a Trader Joe's, so I went to the next best organic supply shop--in the comfort of my own living room: iHerb! If you're not familiar with iHerb, they sell brand name natural products from vitamins to beauty products. Not surprisingly, coconut oil on this site had rave reviews as well. I was sold. I bought a jar of it as well as this Alba body lotion. I have dry skin from head to toe during the winter, and those damn Bath & Body Works/Victoria Secret lotions that I must have received 6 of during Christmas, do not hydrate my skin.

If you are interested in making a purchase on iHerb, you can use this code to get $5 off your first order: NEZ002

From Amazon, I purchased these My Beauty Diary masks since they were on sale. I bought the Aloe and Mixed Berry masks. The aloe mask is targeted for dry and sensitive skin, and the berry mask claims to brighten skin. I will probably post a review on these masks in the near future. I also bought Korres Quercetin & Oak Antiageing & Antiwrinkle Night Cream. I saw it on Sephora, but was able to snag it on Amazon for just $35 ($17 cheaper than Sephora!). Last but not least, I purchased the Ole Henricksen Truth Serum Collagen Booster. This is my very first serum, but the benefits seemed well worth it. I bought a 0.5 oz bottle for just $18 (a 1 oz bottle at Sephora is $48).

Hopefully, I will see good results with these products.

Read more...

2011 Beauty Favorites

 Sunday, January 8, 2012

Hi everyone! Here is an overdue post on my favorite beauty products for 2011. I'm astounded that 2011 is already over, but I'm excited to start anew! I have so many goals set for 2012, one being to be less neglectful of this blog. I'm going to try to post on a consistent basis, although I predict that I may go on a hiatus once optometry school begins in August.

Skincare/Body:
-Basis Cleaner Face Wash: leaves my face feeling squeaky clean and is great for sensitive skin (soap free, oil free, etc.)
-Body Shop Vitamin E Eye Cream: diminished my dark under eye circles in just a week of consistent use.
-Sonia Kashuk Eye Makeup Remover: always removes every trace of eye makeup.
-Tree Hut Brazilian Nut Body Wash: smells amazing!
-Yes to Cucumbers Facial Towlettes: removes my face makeup without irritation and leaves my skin feeling clean and refreshed.

Makeup:
-Urban Decay Naked Palette: my go to palette for any neutral or smokey eye look.
-Milani Liquid Eyeliner: is budge-proof throughout the day and has a sharp tip for drawing precise lines.
-Revlon Lip Butters: comes in a variety of colors, cute packaging, and really moisturizing. My favorite color is Fig Jam (pictured). It looks really dark in the tube, but is much lighter on the lips.
-Loreal Magic Souffle Foundation: provides good coverage, does not look cakey, and stays put throughout the day.
-Neutrogena Healthy Skin Foundation: provides good coverage, does not look cakey, and stays put throughout the day.
-Amazing Concealer by Amazing Cosmetics: conceals blemishes very well
-Stila Kajal Eyeliner in Pearl: my favorite eyeliner to use in the inner corners of my eyes. So creamy, bright, and stays put all day.

Read more...

Blog template by simplyfabulousbloggertemplates.com

Back to TOP